模式开发之旅(22):中介模式
2010-09-09 10:02:25中介模式:定义了一个单独的(中介)对象,来封装一组对象之间的交互。将这组对象之间的交互委派给与中介对象交互,来避免对象之间的直接交互。
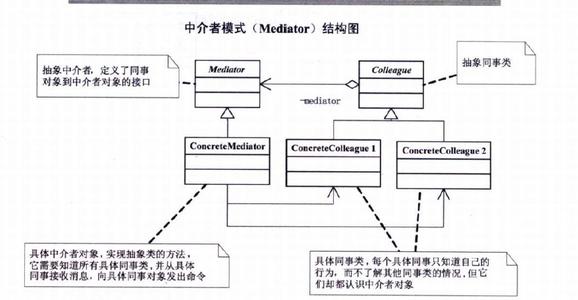
中介模式的设计思想跟中间层很像,通过引入中介这个中间层,将一组对象之间的交互关系(或者说依赖关系)从多对多(网状关系)转换为一对多(星状关系)。原来一个对象要跟 n 个对象交互,现在只需要跟一个中介对象交互,从而最小化对象之间的交互关系,降低了代码的复杂度,提高了代码的可读性和可维护性。
提到中介模式,有一个比较经典的例子不得不说,那就是航空管制。
为了让飞机在飞行的时候互不干扰,每架飞机都需要知道其他飞机每时每刻的位置,这就需要时刻跟其他飞机通信。飞机通信形成的通信网络就会无比复杂。这个时候,我们通过引入“塔台”这样一个中介,让每架飞机只跟塔台来通信,发送自己的位置给塔台,由塔台来负责每架飞机的航线调度。这样就大大简化了通信网络。
刚刚举的是生活中的例子,我们再举一个跟编程开发相关的例子。这个例子与 UI 控件有关,算是中介模式比较经典的应用,很多书籍在讲到中介模式的时候,都会拿它来举例。
假设我们有一个比较复杂的对话框,对话框中有很多控件,比如按钮、文本框、下拉框等。当我们对某个控件进行操作的时候,其他控件会做出相应的反应,比如,我们在下拉框中选择“注册”,注册相关的控件就会显示在对话框中。如果我们在下拉框中选择“登陆”,登陆相关的控件就会显示在对话框中。
我们按照中介模式,各个控件只跟中介对象交互,中介对象负责所有业务逻辑的处理。
public interface Mediator
{
    void HandleEvent(Component component, string @event);
}
public class LandingPageDialog : Mediator
{
    private Button loginButton;
    private Button regButton;
    private Selection selection;
    private Input usernameInput;
    private Input passwordInput;
    private Input repeatedPswdInput;
    private Text hintText;

    public override void HandleEvent(Component component, string @event)
    {
        if (component.Equals(loginButton))
        {
            string username = usernameInput.Text();
            string password = passwordInput.Text();
            //校验数据...
            //做业务处理...
        }
        else if (component.Equals(regButton))
        {
            //获取usernameInput、passwordInput、repeatedPswdInput数据...
            //校验数据...
            //做业务处理...
        }
        else if (component.Equals(selection))
        {
            string selectedItem = selection.Select();
            if (selectedItem.Equals("login"))
            {
                usernameInput.Show();
                passwordInput.Show();
                repeatedPswdInput.Hide();
                hintText.Hide();
                //...省略其他代码
            }
            else if (selectedItem.Equals("register"))
            {
                //....
            }
        }
    }
}

public class UIControl
{
    private const string LOGIN_BTN_ID = "login_btn";
    private const string REG_BTN_ID = "reg_btn";
    private const string USERNAME_INPUT_ID = "username_input";
    private const string PASSWORD_INPUT_ID = "pswd_input";
    private const string REPEATED_PASSWORD_INPUT_ID = "repeated_pswd_input";
    private const string HINT_TEXT_ID = "hint_text";
    private const string SELECTION_ID = "selection";
    public static void main(string[] args)
    {
        Button loginButton = (Button)findViewById(LOGIN_BTN_ID);
        Button regButton = (Button)findViewById(REG_BTN_ID);
        Input usernameInput = (Input)findViewById(USERNAME_INPUT_ID);
        Input passwordInput = (Input)findViewById(PASSWORD_INPUT_ID);
        Input repeatedPswdInput = (Input)findViewById(REPEATED_PASSWORD_INPUT_ID);
        Text hintText = (Text)findViewById(HINT_TEXT_ID);
        Selection selection = (Selection)findViewById(SELECTION_ID);
        Mediator dialog = new LandingPageDialog();
        dialog.SetLoginButton(loginButton);
        dialog.SetRegButton(regButton);
        dialog.SetUsernameInput(usernameInput);
        dialog.SetPasswordInput(passwordInput);
        dialog.SetRepeatedPswdInput(repeatedPswdInput);
        dialog.SetHintText(hintText);
        dialog.SetSelection(selection);
        loginButton.OnClick += dialog.HandleEvent(loginButton, "click");
        regButton.OnClick += dialog.HandleEvent(regButton, "click");
    }
}
从代码中我们可以看出,原本业务逻辑会分散在各个控件中,现在都集中到了中介类中。实际上,这样做既有好处,也有坏处。好处是简化了控件之间的交互,坏处是中介类有可能会变成大而复杂的“上帝类”(God Class)。所以,在使用中介模式的时候,我们要根据实际的情况,平衡对象之间交互的复杂度和中介类本身的复杂度。
中介模式 VS 观察者模式
在观察者模式中,尽管一个参与者既可以是观察者,同时也可以是被观察者,但是,大部分情况下,交互关系往往都是单向的,一个参与者要么是观察者,要么是被观察者,不会兼具两种身份。也就是说,在观察者模式的应用场景中,参与者之间的交互关系比较有条理。
而中介模式正好相反。只有当参与者之间的交互关系错综复杂,维护成本很高的时候,我们才考虑使用中介模式。毕竟,中介模式的应用会带来一定的副作用,前面也讲到,它有可能会产生大而复杂的上帝类。除此之外,如果一个参与者状态的改变,其他参与者执行的操作有一定先后顺序的要求,这个时候,中介模式就可以利用中介类,通过先后调用不同参与者的方法,来实现顺序的控制,而观察者模式是无法实现这样的顺序要求的。