Net企业级AI项目5:生成式UI
2026-02-07 18:07:32一、前端环境搭建
1. 技术选型
前端 UI 我们采用 VUE + TS + Vite + Element Plus + ECharts + Pinia + SPA 来实现。
- 步骤 1,创建 Vue 项目,在 src 目录下执行:
npm create vue@latest
项目名称: Qjy.AICopilot.VueUI
功能:TypeScript、Pinia、ESLint、Prettier
- 步骤 2,安装项目依赖包,我们进入到刚刚创建的 vue 项目,分别执行下面命令
cd Qjy.AICopilot.VueUI
npm install
npm install element-plus @element-plus/icons-vue
npm install echarts
npm install markdown-it @microsoft/fetch-event-source
npm install -D @types/markdown-it
- 步骤 3,启用 pinia 和 element-plus
//Qjy.AICoplot.VueUI/src/main.ts
import { createApp } from 'vue'
import { createPinia } from 'pinia'
import ElementPlus from 'element-plus'
import 'element-plus/dist/index.css'

import App from './App.vue'

const app = createApp(App)  // 创建应用实例

app.use(createPinia())  // 注册状态管理插件
app.use(ElementPlus)    // 注册 ElementPlus 插件

app.mount('#app') // 挂载到 index.html 的 #app 节点
2. Aspire 集成
- 步骤 4,使用 Aspire 启动 vue 项目。先在 Asprise 项目安装 nuget 包:CommunityToolkit.Aspire.Hosting.NodeJS.Extensions
//Qjy.AICopilot.AppHost/AppHost.cs
builder.AddViteApp("aicopilot-vueui", "../Qjy.AICopilot.VueUI")
    .WithEndpoint("http", endpointAnnotation =>
    {
        endpointAnnotation.Port = 5173;
    })
    .WaitFor(httpapi)
    .WithReference(httpapi);
- 步骤 5,前端反向代理调用后台 httpapi
//Qjy.AICoplot.VueUI/vite.config.ts
import { fileURLToPath, URL } from 'node:url'
import { defineConfig } from 'vite'
import { env } from 'node:process';
import { baseUrl } from './src/appsetting'
import vue from '@vitejs/plugin-vue'
import vueDevTools from 'vite-plugin-vue-devtools'

// https://vite.dev/config/
export default defineConfig(({ mode }) => {
  // 动态获取 Aspire 注入的后端地址
  // 格式通常为: {服务名}_http
  // 这里的 'aicopilot_httpapi' 必须与 AppHost 中 AddProject 的名称一致
  const target = env.aicopilot_httpapi_http;

  console.log('Detected Backend Target:', target); // 调试用,启动时打印地址

  return {
    plugins: [
      vue(),
      vueDevTools(),
    ],
    resolve: {
      alias: {
        '@': fileURLToPath(new URL('./src', import.meta.url))
      },
    },
    server: {
      host: true,
      proxy: {
        // 配置反向代理
        // 所有以 baseUrl 开头的请求,都会被转发到 target
        [baseUrl]: {
          target: target,
          changeOrigin: true,
          secure: false, // 开发环境通常使用自签名证书,需要关闭安全验证
        }
      }
    }
  }
})
asspetting.ts 是一个后端信息的配置文件,我们这里为了方便把 token 写死了。
//Qjy.AICoplot.VueUI/src/appsetting.ts
export const token = "xxx";
export const baseUrl = '/api';
完成上面步骤后就可以使用 Asprise 同时启动前后端项目了,并且会通过 Asprise 将后台的地址注入到前端应用的环境变量中,前端通过 env.aicopilot_httpapi_http 来访问,这种访问方式没有跨域问题。
二、前端架构设计
1. 前端分层思想
前端我们也使用分层设计的思想,我们把前端分成:
- 数据模型层:负责数据格式的定义
- API 服务层:负责跟后台 API 交互
- 状态管理层:通过 Pinia 管理状态数据
- 视图层:采用组件设计思想,分块完成各个组件的设计
2. 数据模型定义
- 后端数据模型(protocols.ts):一比一复刻后台结构,方便直接解析。
//Qjy.AICoplot.VueUI/src/types/protocols.ts
// ---------------------- 数据传输对象 ----------------------
/**
 * 对应后端的 Session 实体
 * 简化的会话信息
 */
export interface Session {
  id: string;
  title: string;
}

/**
 * 消息发送者枚举
 */
export enum MessageRole {
  User = 'User',
  Assistant = 'Assistant'
}

/**
 * 对应后端的 ChunkType 枚举
 * 决定了消息流中的数据块是纯文本还是可视化组件
 */
export enum ChunkType {
  Error = 'Error',
  Text = 'Text',
  Intent = 'Intent',
  Widget = 'Widget',
  FunctionResult = 'FunctionResult',
  FunctionCall = 'FunctionCall'
}

/**
 * 对应后端的 ChatChunk 类
 * 这是流式响应中每一次传输的最小单元
 */
export interface ChatChunk {
  source: string;     // 执行器ID,用于追踪是谁生成的
  type: ChunkType;    // 数据类型
  content: string;    // 内容载体(文本或JSON字符串)
}

/**
 * 对应后端的 IntentResult 实体
 * 意图结果
 */
export interface IntentResult {
  intent: string;
  confidence: number;
  reasoning?: string;
  query?: string;
}

// ---------------------- 可视化组件相关定义 ----------------------
/**
 * 基础组件接口
 */
export interface Widget {
  id: string;      // 组件唯一标识
  type: string;    // 组件类型:'Chart', 'StatsCard', 'DataTable'
  title: string;  // 组件标题
  description: string; // 描述
  data: any;       // 具体的数据载体,根据类型不同而不同
}

/**
 * 对应后端的 ChartWidget
 */
export interface ChartWidget extends Widget {
  type: 'Chart';
  data: {
    category: 'Bar' | 'Line' | 'Pie';
    dataset: {
      dimensions: string[];
      source: Array<Record<string, any>>;
    };
    encoding: {
      x: string;
      y: string[];
      seriesName?: string;
    };
  };
}

/**
 * 对应后端的 StatsCardWidget
 */
export interface StatsCardWidget extends Widget {
  type: 'StatsCard';
  data: {
    label: string;
    value: string | number;
    unit?: string;
  };
}

/**
 * 对应后端的 DataTableWidget
 */
export interface DataTableWidget extends Widget {
  type: 'DataTable';
  data: {
    columns: Array<{
      key: string;
      label: string;
      dataType: 'string' | 'number' | 'date' | 'boolean';
    }>;
    rows: Array<Record<string, any>>;
  };
}
- 前端数据模型(models.ts):负责定义一些后台返回过来的数据无法满足前端显示的要求,或者一些前端专用的数据模型。
- FunctionCall 接口,将函数调用与函数返回合并成一个数据模型
- 又函数调用的返回值是一个 json ,其格式是不确定,所以我们还进一步扩展 ChatChunk 数据模型
- 然后定义了一个前端专用的消息模型 ChatMessage,后端发过来的数据是碎片化的,我们需要在前端进行整合后显示
//Qjy.AICoplot.VueUI/src/types/models.ts
import { type ChatChunk, type IntentResult, MessageRole, type Widget } from "@/types/protocols.ts";

// ---------------------- 前端数据结构 ----------------------
/**
 * 函数调用信息结构
 * FunctionCallContent + FunctionResultContent 合并
 */
export interface FunctionCall {
  id: string;
  name: string;
  args: string;
  result?: string;
  status: 'calling' | 'completed';
}

/**
 * 扩展消息块-意图识别块
 */
export interface IntentChunk extends ChatChunk {
  intents: IntentResult[]
}

/**
 * 扩展消息块-函数调用块
 */
export interface FunctionCallChunk extends ChatChunk {
  functionCall: FunctionCall;
}

/**
 * 扩展消息块-组件块
 */
export interface WidgetChunk extends ChatChunk {
  widget: Widget;
}

/**
 * 前端使用的消息模型
 */
export interface ChatMessage {
  sessionId: string;
  role: MessageRole;
  chunks: ChatChunk[];
  isStreaming: boolean;
  timestamp: number;
}
3. API 服务层
- API 代理(apiClient.ts):主要是封装 fetch,提供简化的 get 和 post 方法。
//Qjy.AICoplot.VueUI/src/services/apiClient.ts
import { token, baseUrl } from "@/appsetting";

/**
 * 基础 API 客户端
 * 封装了 fetch,统一处理 URL 前缀和 JSON 序列化
 */
export const apiClient = {
  /**
   * 获取统一的请求头
   */
  getHeaders(): HeadersInit {
    return {
      'Content-Type': 'application/json',
      'Authorization': `Bearer ${token}` // 注入认证头
    };
  },

  /**
   * 发送 POST 请求
   */
  async post<T>(endpoint: string, body: any): Promise<T> {
    const response = await fetch(`${baseUrl}${endpoint}`, {
      method: 'POST',
      headers: this.getHeaders(),
      body: JSON.stringify(body)
    });

    if (!response.ok) {
      // 如果 401,提示 Token 可能过期
      if (response.status === 401) {
        console.error("Token 无效或已过期");
      }
      throw new Error(`API Error: ${response.statusText}`);
    }

    // 尝试解析 JSON
    try {
      return await response.json();
    } catch {
      return {} as T; // 处理空响应
    }
  },

  /**
   * 发送 GET 请求
   */
  async get<T>(endpoint: string): Promise<T> {
    const response = await fetch(`${baseUrl}${endpoint}`, {
      method: 'GET',
      headers: this.getHeaders()
    });

    if (!response.ok) {
      if (response.status === 401) {
        console.error("Token 无效或已过期,请更新 TEST_TOKEN");
      }
      throw new Error(`API Error: ${response.statusText}`);
    }

    return await response.json();
  }
};
- 流水处理(chatService.ts):流式通信服务,默认不支持 post,使用微软的库来实现 post 的 SSE。关键点 StreamCallbacks,自定义的回调处理事件
//Qjy.AICoplot.VueUI/src/services/chatService.ts
import { fetchEventSource } from '@microsoft/fetch-event-source';
import { apiClient } from './apiClient';
import { token, baseUrl } from "@/appsetting";
import type { ChatChunk } from "@/types/protocols.ts";

/**
 * 定义流式回调函数的接口
 * 上层调用者(Store)通过这些回调接收数据
 */
interface StreamCallbacks {
  onChunkReceived: (chunk: ChatChunk) => void;       // 当收到数据块时
  onComplete: () => void;                            // 当流结束时
  onError: (err: any) => void;                       // 当发生错误时
}

export const chatService = {
  /**
   * 获取会话列表
   */
  async getSessions() {
    return await apiClient.get<any[]>('/aigateway/session/list');
  },

  /**
   * 创建新会话
   */
  async createSession() {
    return await apiClient.post<any>('/aigateway/session', {});
  },

  /**
   * 发送消息并接收流式响应
   * @param sessionId 会话ID
   * @param message 用户输入的内容
   * @param callbacks 回调函数集合
   */
  async sendMessageStream(sessionId: string, message: string, callbacks: StreamCallbacks) {
    const ctrl = new AbortController();

    try {
      // 使用微软的库发起 SSE 请求
      await fetchEventSource(`${baseUrl}/aigateway/chat`, {
        method: 'POST',
        headers: {
          'Content-Type': 'application/json',
          'Authorization': `Bearer ${token}`
        },
        body: JSON.stringify({
          sessionId: sessionId,
          message: message
        }),
        signal: ctrl.signal,

        // 1. 处理连接打开
        async onopen(response) {
          if (response.ok) {
            return; // 连接成功
          } else {
            throw new Error(`连接失败: ${response.status}`);
          }
        },

        // 2. 处理消息接收
        onmessage(msg) {
          try {
            // 解析后端发来的 ChatChunk JSON
            const chunk: ChatChunk = JSON.parse(msg.data);
            console.log(chunk);
            callbacks.onChunkReceived(chunk);
          } catch (err) {
            console.error('无法解析区消息块:', err);
          }
        },

        // 3. 处理连接关闭
        onclose() {
          callbacks.onComplete();
        },

        // 保持连接,即使页面进入后台
        openWhenHidden: true
      });
    } catch (err) {
      callbacks.onError(err);
    }
  }
};
4. 状态管理
这是前端响应式的内存数据库,封装前端数据展示的核心逻辑。
//Qjy.AICoplot.VueUI/src/stores/chatStore.ts
import { defineStore } from 'pinia';
import { computed, ref } from 'vue';
import { chatService } from '@/services/chatService.ts';
import {
  type ChatChunk,
  ChunkType,
  type IntentResult,
  MessageRole,
  type Session, type Widget
} from "@/types/protocols";
import type {
  ChatMessage,
  FunctionCall,
  FunctionCallChunk, IntentChunk,
  WidgetChunk
} from "@/types/models.ts";

export const useChatStore = defineStore('chat', () => {
  // ================= 状态 (State) =================
  // 会话列表
  const sessions = ref<Session[]>([]);
  // 当前选中的会话 ID
  const currentSessionId = ref<string | null>(null);
  // 消息记录字典:Key是会话ID,Value是该会话的消息列表
  const messagesMap = ref<Record<string, ChatMessage[]>>({});
  // 正在接收消息的标志
  const isStreaming = ref(false);

  // ================= 计算属性 =================
  /**
   * 获取当前会话的所有消息
   */
  const currentMessages = computed(() => {
    if (!currentSessionId.value) return [];
    return messagesMap.value[currentSessionId.value] || [];
  });
  /**
   * 获取当前选中的会话对象
   */
  const currentSession = computed(() => {
    if (!currentSessionId.value) return { title: '当前没有选择会话' } as Session;
    return sessions.value
      .find(session => session.id === currentSessionId.value)
  });

  // ================= 动作 (Actions) =================
  /**
   * 初始化:加载会话列表
   */
  async function init() {
    try {
      sessions.value = await chatService.getSessions();
    } catch (error) {
      console.error('无法加载会话', error);
    }
  }

  /**
   * 创建新会话并选中
   */
  async function createNewSession() {
    const newSession = await chatService.createSession();
    sessions.value.unshift(newSession);
    currentSessionId.value = newSession.id;
    messagesMap.value[newSession.id] = [];
  }

  /**
   * 切换会话
   */
  async function selectSession(id: string) {
    currentSessionId.value = id;
  }

  /**
   * 发送消息的核心逻辑
   */
  async function sendMessage(input: string) {
    if (!currentSessionId.value) {
      alert('请先选择一个会话');
      return;
    }
    if (isStreaming.value) {
      alert('请等待上一条消息的回复完成');
      return;
    }

    const sessionId = currentSessionId.value;

    // 1. 在 UI 上立即显示用户的消息
    const userMsg: ChatMessage = {
      sessionId,
      role: MessageRole.User,
      chunks: [{
        source: 'User',
        type: ChunkType.Text,
        content: input
      }],
      isStreaming: false,
      timestamp: Date.now()
    };
    addMessage(sessionId, userMsg);

    // 2. 预先创建一个空的 AI 回复消息(占位符)
    const aiMsg: ChatMessage = {
      sessionId,
      role: MessageRole.Assistant,
      chunks: [], // 初始为空,随流动态增加
      isStreaming: true,
      timestamp: Date.now()
    };
    const targetMsg = addMessage(sessionId, aiMsg);

    isStreaming.value = true;

    // 3. 调用 API 服务,开始接收流
    await chatService.sendMessageStream(sessionId, input, {
      onChunkReceived: (chunk: ChatChunk) => {
        switch (chunk.type) {
          case ChunkType.Text:
            addTextChunk(targetMsg, chunk);
            break;
          case ChunkType.Intent:
            addIntentChunk(targetMsg, chunk);
            break;
          case ChunkType.FunctionCall:
            addFunctionCallChunk(targetMsg, chunk);
            break;
          case ChunkType.FunctionResult:
            addFunctionResultChunk(targetMsg, chunk);
            break;
          case ChunkType.Widget:
            addWidgetChunk(targetMsg, chunk);
        }
      },

      // 完成时
      onComplete: () => {
        isStreaming.value = false;
        targetMsg.isStreaming = false;
      },

      // 错误时
      onError: (err) => {
        isStreaming.value = false;
      }
    });
  }

  // ================= 辅助函数 (Internal) =================
  /**
   * 发送消息的核心逻辑
   */
  function addMessage(sid: string, msg: ChatMessage): ChatMessage {
    if (!messagesMap.value[sid]) {
      messagesMap.value[sid] = [];
    }
    const list = messagesMap.value[sid];
    list.push(msg);
    return list[list.length - 1]!;
  }

  /**
   * 添加文本块
   */
  function addTextChunk(msg: ChatMessage, chunk: ChatChunk) {
    const preChunk = msg.chunks[msg.chunks.length - 1];

    if (preChunk === undefined) {
      msg.chunks.push(chunk);
      return;
    }

    if (preChunk.source === chunk.source && preChunk.type === ChunkType.Text) {
      preChunk.content += chunk.content;
    } else {
      msg.chunks.push(chunk);
    }
  }

  /**
   * 添加意图识别块
   */
  function addIntentChunk(msg: ChatMessage, chunk: ChatChunk) {
    const intents = JSON.parse(chunk.content) as IntentResult[];
    const intentChunk = {
      ...chunk,
      intents
    } as IntentChunk;
    msg.chunks.push(intentChunk);
  }

  /**
   * 添加函数调用块
   */
  function addFunctionCallChunk(msg: ChatMessage, chunk: ChatChunk) {
    const functionCall = JSON.parse(chunk.content) as FunctionCall;
    functionCall.status = 'calling';

    const fcChunk = {
      ...chunk,
      functionCall
    } as FunctionCallChunk;
    msg.chunks.push(fcChunk);
  }

  /**
   * 添加函数结果块
   */
  function addFunctionResultChunk(msg: ChatMessage, chunk: ChatChunk) {
    const functionResult = JSON.parse(chunk.content) as FunctionCall;
    const functionCallChunks = msg.chunks
      .filter(c => c.type === ChunkType.FunctionCall) as FunctionCallChunk[];
    const fcChunk = functionCallChunks.find(c => c.functionCall.id === functionResult.id);
    if (fcChunk) {
      fcChunk.functionCall.result = functionResult.result;
      fcChunk.functionCall.status = 'completed';
    }
  }

  /**
   * 添加组件块
   */
  function addWidgetChunk(msg: ChatMessage, chunk: ChatChunk) {
    const widget = JSON.parse(chunk.content) as Widget;
    const widgetChunk = {
      ...chunk,
      widget
    } as WidgetChunk
    msg.chunks.push(widgetChunk);
  }

  // 导出
  return {
    sessions,
    currentSessionId,
    currentSession,
    currentMessages,
    isStreaming,
    init,
    createNewSession,
    selectSession,
    sendMessage
  };
});
三、实现视图层
1. 实现基础聊天界面
- 启动页面,启用 chatStore,创建一个 ChatWindow 的组件
//Qjy.AICoplot.VueUI/src/App.vue
<script setup lang="ts">
  import { onMounted } from 'vue';
  import { useChatStore } from './stores/chatStore';
  import ChatWindow from './components/chat/ChatWindow.vue';

  const chatStore = useChatStore();

  // 应用启动时,自动获取历史会话
  onMounted(async () => {
    await chatStore.init();
    // 如果没有会话,自动创建一个新的,避免空白
    if (chatStore.sessions.length === 0) {
      await chatStore.createNewSession();
    }
  });
</script>

<template>
  <div class="app-container">
    <ChatWindow />
  </div>
</template>

<style scoped>
  .app-container {
    height: 100vh;
    display: flex;
    justify-content: center;
    align-items: center;
    font-family: 'Inter', sans-serif;
  }
</style>
- 全局样式
//Qjy.AICoplot.VueUI/src/assets/main.css
:root {
  /* 定义语义化颜色变量 */
  --bg-color-primary: #ffffff;
  --bg-color-secondary: #f3f5f7; /* 侧边栏背景 */
  --border-color: #e5e7eb;
  --text-primary: #1f2937;
  --text-secondary: #6b7280;
  /* 品牌色 - 对应 Element Plus 的 Primary */
  --brand-color: #409eff;
  /* 消息气泡颜色 */
  --bubble-bg-user: #e1effe;
  --bubble-bg-ai: #f3f4f6;
}

body {
  margin: 0;
  padding: 0;
  font-family: 'Inter', -apple-system, BlinkMacSystemFont, "Segoe UI", Roboto, "Helvetica Neue", Arial, sans-serif;
  -webkit-font-smoothing: antialiased;
  background-color: var(--bg-color-primary);
  color: var(--text-primary);
  height: 100vh;
  overflow: hidden; /* 防止整个页面出现滚动条,只让内部组件滚动 */
}

#app {
  height: 100%;
  width: 100%;
}

/* 滚动条美化 */
::-webkit-scrollbar {
  width: 6px;
  height: 6px;
}

::-webkit-scrollbar-thumb {
  background: #d1d5db;
  border-radius: 3px;
}

::-webkit-scrollbar-track {
  background: transparent;
}
- 聊天页面布局:我们采用左右分布,左边是一个会话列表;右边是消息信息和发送消息操作。
//Qjy.AICoplot.VueUI/src/components/chat/ChatWindow.vue
<script setup lang="ts">
import { ref, watch, nextTick } from 'vue';
import { useChatStore } from '@/stores/chatStore.ts';
import SessionList from './SessionList.vue';
import MessageItem from './MessageItem.vue';
import { Promotion } from '@element-plus/icons-vue';

const store = useChatStore();
const inputValue = ref('');
const scrollContainer = ref<HTMLElement | null>(null);

// 发送消息处理
const handleSend = async () => {
  const content = inputValue.value.trim();
  if (!content || store.isStreaming) return;

  // 清空输入框
  inputValue.value = '';

  // 调用 Store 发送
  await store.sendMessage(content);
};

// 滚动到底部逻辑
const scrollToBottom = async () => {
  await nextTick(); // 等待 Vue DOM 更新完成
  if (scrollContainer.value) {
    scrollContainer.value.scrollTop = scrollContainer.value.scrollHeight;
  }
};

// 监听消息列表变化,自动滚动
// deep: true 确保能监听到数组内部元素的变化(如流式传输时的内容追加)
watch(
  () => store.currentMessages,
  () => {
    scrollToBottom();
  },
  { deep: true }
);

// 切换会话时也要滚动到底部
watch(
  () => store.currentSessionId,
  () => {
    scrollToBottom();
  }
);
</script>

<template>
  <div class="chat-layout">
    <div class="sidebar-wrapper">
      <SessionList />
    </div>

    <div class="main-wrapper">
      <header class="chat-header">
        <h2>前金院智能助手</h2>
      </header>

      <main class="chat-viewport" ref="scrollContainer">
        <div class="messages-list">
          <div v-if="store.currentMessages.length === 0" class="welcome-banner">
            <h3>👋 欢迎使用前金院 AI Copilot</h3>
          </div>
          <MessageItem
            v-for="msg in store.currentMessages"
            :key="msg.timestamp"
            :message="msg"
          />
        </div>
      </main>

      <footer class="chat-input-area">
        <div class="input-container">
          <el-input v-model="inputValue"
                    type="textarea"
                    :autosize="{ minRows: 1, maxRows: 4 }"
                    placeholder="输入您的问题 (Enter 发送, Shift+Enter 换行)..."
                    @keydown.enter.prevent="(e:KeyboardEvent) => { if(!e.shiftKey) handleSend() }"
                    :disabled="store.isStreaming" />
          <el-button type="primary"
                     class="send-btn"
                     :disabled="!inputValue.trim() || store.isStreaming"
                     @click="handleSend">
            <el-icon><Promotion /></el-icon>
          </el-button>
        </div>
        <div class="suggestion-chips">
          <el-tag @click="inputValue='分析各仓库库存占比';handleSend()" class="chip">分析各仓库库存占比</el-tag>
          <el-tag @click="inputValue='查询最近一周的销售趋势'" class="chip">查询销售趋势</el-tag>
        </div>
        <div class="footer-tip">
          AI 生成的内容可能不准确,请核实重要信息。
        </div>
      </footer>
    </div>
  </div>
</template>

<style scoped>
.chat-layout {
  display: flex;
  height: 100%;
  width: 100%;
  overflow: hidden;
}

.sidebar-wrapper {
  width: 260px;
  flex-shrink: 0;
}

.main-wrapper {
  flex: 1;
  display: flex;
  flex-direction: column;
  background-color: var(--bg-color-primary);
  position: relative;
}

.chat-header {
  height: 60px;
  border-bottom: 1px solid var(--border-color);
  display: flex;
  align-items: center;
  padding: 0 24px;
  font-weight: 600;
}

.chat-viewport {
  flex: 1;
  overflow-y: auto;
  padding: 24px;
  scroll-behavior: smooth; /* 平滑滚动 */
}

.messages-list {
  max-width: 800px; /* 限制内容最大宽度,提升阅读体验 */
  margin: 0 auto;
}

.chat-input-area {
  padding: 24px;
  border-top: 1px solid var(--border-color);
  background-color: #fff;
}

.input-container {
  max-width: 800px;
  margin: 0 auto;
  display: flex;
  gap: 12px;
  align-items: flex-end; /* 底部对齐 */
}

.send-btn {
  height: 40px;
  width: 40px;
  border-radius: 8px;
}

.footer-tip {
  text-align: center;
  color: var(--text-secondary);
  font-size: 12px;
  margin-top: 8px;
}

.welcome-banner {
  text-align: center;
  margin-top: 100px;
  color: var(--text-secondary);
}

.suggestion-chips {
  margin-top: 20px;
  display: flex;
  justify-content: center;
  gap: 10px;
}

.chip {
  cursor: pointer;
}
</style>
- 会话列表组件:
//Qjy.AICoplot.VueUI/src/components/chat/SessionList.vue
<script setup lang="ts">
import { computed } from 'vue';
import { useChatStore } from '@/stores/chatStore.ts';
import { Plus, ChatDotRound } from '@element-plus/icons-vue';

// 连接 Store
const store = useChatStore();

// 计算属性:会话列表
const sessions = computed(() => store.sessions);
const currentId = computed(() => store.currentSessionId);

// 处理点击
const handleSelect = (id: string) => {
  store.selectSession(id);
};

const handleNewChat = () => {
  store.createNewSession();
};
</script>

<template>
  <div class="session-sidebar">
    <div class="sidebar-header">
      <el-button
        type="primary"
        class="new-chat-btn"
        :icon="Plus"
        @click="handleNewChat"
      >
        新建会话
      </el-button>
    </div>

    <div class="session-list">
      <div
        v-for="session in sessions"
        :key="session.id"
        class="session-item"
        :class="{ active: currentId === session.id }"
        @click="handleSelect(session.id)"
      >
        <el-icon class="icon"><ChatDotRound /></el-icon>
        <span class="title">{{ session.title }}</span>
      </div>

      <div v-if="sessions.length === 0" class="empty-tip">
        暂无历史会话
      </div>
    </div>
  </div>
</template>

<style scoped>
.session-sidebar {
  display: flex;
  flex-direction: column;
  height: 100%;
  background-color: var(--bg-color-secondary);
  border-right: 1px solid var(--border-color);
}

.sidebar-header {
  padding: 20px;
  flex-shrink: 0; /* 防止头部被压缩 */
}

.new-chat-btn {
  width: 100%;
  border-radius: 8px;
}

.session-list {
  flex: 1; /* 占据剩余高度 */
  overflow-y: auto; /* 内部滚动 */
  padding: 0 12px;
}

.session-item {
  display: flex;
  align-items: center;
  padding: 12px 16px;
  margin-bottom: 8px;
  border-radius: 8px;
  cursor: pointer;
  color: var(--text-primary);
  transition: all 0.2s ease;
  font-size: 14px;
}

.session-item:hover {
  background-color: rgba(0, 0, 0, 0.05);
}

.session-item.active {
  background-color: #e6f0ff; /* 激活态背景色 */
  color: var(--brand-color);
  font-weight: 500;
}

.session-item .icon {
  margin-right: 10px;
  font-size: 16px;
}

.session-item .title {
  white-space: nowrap;
  overflow: hidden;
  text-overflow: ellipsis; /* 文字过长显示省略号 */
}

.empty-tip {
  text-align: center;
  color: var(--text-secondary);
  font-size: 12px;
  margin-top: 20px;
}
</style>
- 消息体组件
//Qjy.AICoplot.VueUI/src/components/chat/MessageItem.vue
<script setup lang="ts">
import { computed } from 'vue';
import { UserFilled, Service } from '@element-plus/icons-vue';
import { MessageRole } from '@/types/protocols.ts';
import BlockIntent from './BlockIntent.vue';
import BlockAnalysis from './BlockAnalysis.vue';
import BlockFinal from './BlockFinal.vue';
import type {ChatMessage, IntentChunk} from "@/types/models.ts";

const props = defineProps<{
  message: ChatMessage
}>();

const isUser = computed(() => props.message.role === MessageRole.User);

const intents = computed(() =>{
  const chunk = props.message.chunks.find(chunk => chunk.source === 'IntentRoutingExecutor') as IntentChunk;
  return chunk?.intents || [];
});

const dataChunks = computed(() =>
  props.message.chunks.filter(chunk => chunk.source === 'DataAnalysisExecutor') || []
);

const finalChunks = computed(() =>
  props.message.chunks.filter(chunk => chunk.source === 'FinalProcessExecutor' || chunk.source === 'User') || []
);
</script>

<template>
  <div class="message-row" :class="{ 'row-reverse': isUser }">
    <div class="avatar-container">
      <el-avatar
        :size="36"
        :icon="isUser ? UserFilled : Service"
        :class="isUser ? 'avatar-user' : 'avatar-ai'"
        :style="{ backgroundColor: isUser ? '#f0f0f0' : '#e1f3d8' }"
      />
    </div>

    <div class="content-container">
      <BlockIntent
        v-if="intents.length > 0"
        :intents="intents"/>

      <BlockAnalysis
        v-if="dataChunks.length > 0"
        :chunks="dataChunks"
        :is-streaming="message.isStreaming"/>

      <BlockFinal
        v-if="finalChunks.length > 0"
        :chunks="finalChunks"
        :is-user="isUser"
        :is-streaming="message.isStreaming"
      />
    </div>
  </div>
</template>

<style scoped>
.message-row { display: flex; margin-bottom: 20px; align-items: flex-start; }
.row-reverse { flex-direction: row-reverse; }
.avatar-container { margin: 0 10px; }
.content-container { max-width: 85%; display: flex; flex-direction: column; gap: 10px; }
.avatar-user { color: #666; }
.avatar-ai { background-color: #409eff; color: white; }
</style>
目前我们已经完成了页面布局,上面代码中有一些组件还没有实现,下面会继续完成
2. 可视化组件渲染
后端返回的内容包括3部分,意图识别、函数调用和数据分析。前端需要对这3种返回的内容动态进行渲染,在 MessageItem.vue 中已经布局好了这3个组件,接下来我们继续完善它们
- Markdown 解析器,由于 AI 返回过来的内容是 markdown 格式的,我们先封装一个 markdown 内容转 html 内容的工具方法。
//Qjy.AICoplot.VueUI/src/utils/markdown.ts
import MarkdownIt from 'markdown-it';

// 初始化实例
const md = new MarkdownIt({
  html: false,        // 禁用 HTML 标签
  linkify: true,      // 自动识别 URL 为链接
  breaks: true,       // 转换换行符为 <br>
  typographer: true   // 启用一些语言学的替换和引号美化
});

/**
 * 将 Markdown 文本渲染为 HTML 字符串
 */
export function renderMarkdown(text: string): string {
  if (!text) return '';
  return md.render(text);
}
- 意图识别组件
//Qjy.AICoplot.VueUI/src/components/chat/BlockIntent.vue
<script setup lang="ts">
import { Opportunity } from '@element-plus/icons-vue';
import type {IntentResult} from "@/types/protocols.ts";

defineProps<{
  intents: IntentResult[]
}>();

const getIntentColor = (confidence: number) => {
  if (confidence > 0.8) return 'success';
  if (confidence > 0.5) return 'warning';
  return 'danger';
};
</script>

<template>
  <div class="block-intent">
    <el-collapse :model-value="[]">
      <el-collapse-item name="intent">
        <template #title>
          <div class="intent-header">
            <el-icon><Opportunity /></el-icon>
            <span class="label">意图识别</span>
            <div class="intent-tags" v-if="intents.length > 0">
              <template v-for="(item) in intents">
                <el-tag
                  size="small"
                  :type="getIntentColor(item.confidence)"
                  effect="light"
                  class="ml-2 intent-tag"
                >
                  {{ item.intent }} {{ (item.confidence * 100).toFixed(0) }}%
                </el-tag>
              </template>
            </div>
          </div>
        </template>

        <div class="intent-body" v-if="intents.length > 0">
          <div v-for="(item, idx) in intents" :key="idx" class="intent-item">
            <div class="info-row">
              <span class="label">意图:</span>
              <span class="value"><strong>{{ item.intent }}</strong></span>
            </div>
            <div class="info-row" v-if="item.query">
              <span class="label">关键词:</span>
              <span class="value">{{ item.query }}</span>
            </div>
            <div class="info-row" v-if="item.reasoning">
              <span class="label">推理:</span>
              <span class="value">{{ item.reasoning }}</span>
            </div>
            <el-divider v-if="idx < intents.length - 1" class="intent-divider"/>
          </div>
        </div>
      </el-collapse-item>
    </el-collapse>
  </div>
</template>

<style scoped>
.block-intent { background: #fff; border-radius: 8px; border: 1px solid #ebeef5; overflow: hidden; }
.intent-header { display: flex; align-items: center; padding-left: 10px; color: #606266; width: 100%; }
.intent-tags { display: flex; flex-wrap: wrap; gap: 6px; flex: 1; margin-left: 10px; }
.label { font-size: 13px; font-weight: 500; margin-right: 8px; white-space: nowrap; }
.intent-body { padding: 10px 15px; background-color: #f9fafe; font-size: 13px; color: #555; }
.intent-divider { margin: 8px 0; border-top: 1px dashed #dcdfe6; }
.info-row { margin-bottom: 4px; display: flex; }
.info-row .label { color: #888; width: 60px; flex-shrink: 0; }

@keyframes rotating { 0% { transform: rotate(0deg); } 100% { transform: rotate(360deg); } }

/* 覆盖 Element Plus */
:deep(.el-collapse-item__header) { height: auto; min-height: 40px; border-bottom: 1px solid #ebeef5; }
:deep(.el-collapse-item__content) { padding-bottom: 0; }
:deep(.el-collapse) { border: none; }
</style>
- 函数调用组件,函数调用又分成调用和返回2个步骤
//Qjy.AICoplot.VueUI/src/components/chat/BlockFinal.vue
<script setup lang="ts">
import {renderMarkdown} from '@/utils/markdown';
import FunctionCallItem from './FunctionCallItem.vue';
import {type ChatChunk, ChunkType} from "@/types/protocols.ts";
import type {FunctionCallChunk} from "@/types/models.ts";

const props = defineProps<{
  chunks: ChatChunk[]
  isUser: boolean;
  isStreaming: boolean;
}>();

const getFunctionCall = (chunk : ChatChunk): FunctionCallChunk =>
  chunk as FunctionCallChunk;

</script>

<template>
  <div class="block-final message-bubble" :class="isUser ? 'bubble-user' : 'bubble-ai'">
    <template v-for="chunk in chunks">
      <div
        v-if="chunk.type === ChunkType.Text"
        class="markdown-body inline-block-container"
        v-html="renderMarkdown(chunk.content)"
      ></div>

      <div
        v-else-if="chunk.type === ChunkType.FunctionCall"
        class="my-1 inline-block"
      >
        <FunctionCallItem
          :call="getFunctionCall(chunk).functionCall"
          :mini="true"
        />
      </div>

      <span v-if="isStreaming" class="cursor-blink">|</span>
    </template>
  </div>
</template>

<style scoped>
.message-bubble {
  padding: 10px 14px;
  border-radius: 8px;
  font-size: 14px;
  line-height: 1.6;
  position: relative;
  word-break: break-word;
}

/* 用户气泡 */
.bubble-user {
  background-color: #95ec69;
  color: #000;
}

/* AI 气泡 */
.bubble-ai {
  background-color: #fff;
  border: 1px solid #e4e7ed;
  color: #333;
}

.cursor-blink {
  display: inline-block;
  width: 2px;
  height: 14px;
  background: #333;
  animation: blink 1s infinite;
  vertical-align: middle;
  margin-left: 2px;
}

.inline-block { display: inline-block; }
.inline-block-container { display: inline-block; width: 100%; }
.my-1 { margin: 4px 0; }

/* 修正 markdown 里的 p 标签 margin,使其在 steps 拼接时更自然 */
:deep(.markdown-body p:last-child) { margin-bottom: 0; }
:deep(.markdown-body p:first-child) { margin-top: 0; }

@keyframes blink { 0%, 100% { opacity: 1; } 50% { opacity: 0; } }
</style>
//Qjy.AICoplot.VueUI/src/components/chat/FunctionCallItem.vue
<script setup lang="ts">
import { computed } from 'vue';
import {
  CircleCheck,
  CircleClose,
  Loading,
  Operation // 通用图标
} from '@element-plus/icons-vue';
import type {FunctionCall} from "@/types/models.ts";

const props = defineProps<{
  call: FunctionCall;
  mini?: boolean; // 迷你模式(用于最终回复块)
}>();

// --- 状态计算 ---
const isRunning = computed(() => props.call.status === 'calling');
const isSuccess = computed(() => props.call.status === 'completed');

// --- 样式配置 ---
const statusColor = computed(() => {
  if (isRunning.value) return '#E6A23C'; // 橙色:执行中
  if (isSuccess.value) return '#67C23A'; // 绿色:成功
  return '#909399';
});

const statusIcon = computed(() => {
  if (isRunning.value) return Loading;
  if (isSuccess.value) return CircleCheck;
  return CircleClose;
});

const statusText = computed(() => {
  if (isRunning.value) return '正在执行...';
  if (isSuccess.value) return '调用成功';
  return '调用失败';
});

// 格式化参数显示 (尝试格式化 JSON,失败则显示原文本)
const formattedArgs = computed(() => {
  try {
    const json = JSON.parse(props.call.args);
    return JSON.stringify(json, null, 2);
  } catch (e) {
    return props.call.args;
  }
});
</script>

<template>
  <div
    v-if="mini"
    class="fc-mini"
    :class="{ 'is-running': isRunning, 'is-success': isSuccess }"
  >
    <div class="fc-mini-header">
      <el-icon class="icon-indicator" :class="{ 'is-loading': isRunning }">
        <component :is="statusIcon" />
      </el-icon>
      <span class="fc-name font-mono">{{ call.name }}()</span>
    </div>
  </div>

  <div
    v-else
    class="fc-item"
    :class="{
      'border-running': isRunning,
      'border-success': isSuccess
    }"
  >
    <el-collapse>
      <el-collapse-item>
        <template #title>
          <div class="fc-header">
            <div
              class="status-icon-box"
              :style="{
                borderColor: statusColor,
                backgroundColor: isRunning ? '#fff' : statusColor,
                color: isRunning ? statusColor : '#fff'
              }"
            >
              <el-icon :class="{ 'is-loading': isRunning }">
                <component :is="statusIcon" />
              </el-icon>
            </div>

            <div class="fc-info">
              <div class="fc-title-row">
                <span class="fc-label">Function Call:</span>
                <span class="fc-name">{{ call.name }}</span>
              </div>
              <div class="fc-status-text" :style="{ color: statusColor }">
                {{ statusText }}
              </div>
            </div>

            <div v-if="isRunning" class="running-indicator">
              <span class="dot"></span>
              <span class="dot"></span>
              <span class="dot"></span>
            </div>
          </div>
        </template>

        <div class="fc-details">
          <div class="detail-section">
            <div class="section-label">Parameters (Input):</div>
            <pre class="code-block json-content">{{ formattedArgs }}</pre>
          </div>

          <div class="detail-section mt-2">
            <div class="section-label">Execution Result:</div>

            <div v-if="isRunning" class="result-loading">
              <el-icon class="is-loading"><Loading /></el-icon>
              <span>Waiting for output...</span>
            </div>

            <pre v-else class="code-block result-content">{{ call.result || 'No return value' }}</pre>
          </div>
        </div>
      </el-collapse-item>
    </el-collapse>
  </div>
</template>

<style scoped>
/* === 通用 === */
.font-mono { font-family: ui-monospace, SFMono-Regular, Menlo, Monaco, Consolas, monospace; }

/* === 完整模式样式 === */
.fc-item {
  margin-bottom: 8px;
  background: #fff;
  border: 1px solid #e4e7ed;
  border-radius: 6px;
  transition: all 0.3s ease; /* 平滑过渡 */
  overflow: hidden;
}

/* 状态边框 & 呼吸动画 */
.border-running {
  border-color: #f3d19e;
  box-shadow: 0 0 8px rgba(230, 162, 60, 0.2);
  animation: pulse-border 2s infinite;
}
.border-success {
  border-color: #e1f3d8;
  border-left: 4px solid #67C23A; /* 左侧加粗强调 */
}
.border-failed {
  border-color: #fde2e2;
  border-left: 4px solid #F56C6C;
}

/* Header 布局 */
.fc-header {
  display: flex;
  align-items: center;
  width: 100%;
  padding-left: 10px;
  height: 100%;
}

.status-icon-box {
  width: 24px;
  height: 24px;
  border-radius: 50%;
  border: 1px solid;
  display: flex;
  align-items: center;
  justify-content: center;
  margin-right: 12px;
  font-size: 14px;
  transition: all 0.3s;
}

.fc-info {
  display: flex;
  flex-direction: column;
  line-height: 1.3;
}
.fc-title-row {
  display: flex;
  align-items: center;
  font-size: 13px;
  color: #303133;
}
.fc-label {
  color: #909399;
  margin-right: 6px;
  font-size: 12px;
}
.fc-name {
  font-weight: 600;
  font-family: monospace;
  color: #409eff;
}
.fc-status-text {
  font-size: 11px;
}

/* 详情区 */
.fc-details {
  padding: 12px;
  background: #fafafa;
  border-top: 1px solid #ebeef5;
}
.detail-section { margin-bottom: 8px; }
.section-label {
  font-size: 11px;
  text-transform: uppercase;
  color: #909399;
  margin-bottom: 4px;
  font-weight: 600;
}
.code-block {
  margin: 0;
  font-family: monospace;
  font-size: 12px;
  white-space: pre-wrap;
  word-break: break-all;
  padding: 8px;
  border-radius: 4px;
  border: 1px solid #e4e7ed;
}
.json-content { background-color: #fff; color: #606266; }
.result-content { background-color: #f0f9eb; color: #529b2e; border-color: #e1f3d8; }

/* Result Loading 占位符 */
.result-loading {
  display: flex;
  align-items: center;
  gap: 8px;
  color: #909399;
  font-size: 12px;
  padding: 8px;
  background: #fff;
  border: 1px dashed #dcdfe6;
  border-radius: 4px;
}

/* === 迷你模式样式 === */
.fc-mini {
  display: inline-flex;
  align-items: center;
  font-size: 12px;
  padding: 2px 8px;
  border-radius: 12px;
  border: 1px solid #e9e9eb;
  background: #f4f4f5;
  color: #909399;
  margin-right: 8px;
}
.fc-mini-header { display: flex; align-items: center; gap: 6px; }

.fc-mini.is-running {
  background: #fdf6ec;
  border-color: #faecd8;
  color: #e6a23c;
}
.fc-mini.is-success {
  background: #f0f9eb;
  border-color: #e1f3d8;
  color: #67c23a;
}
.fc-mini.is-failed {
  background: #fef0f0;
  border-color: #fde2e2;
  color: #f56c6c;
}

/* === 动画 === */
@keyframes pulse-border {
  0% { box-shadow: 0 0 0 0 rgba(230, 162, 60, 0.4); }
  70% { box-shadow: 0 0 0 6px rgba(230, 162, 60, 0); }
  100% { box-shadow: 0 0 0 0 rgba(230, 162, 60, 0); }
}

/* Element Plus Override */
:deep(.el-collapse) { border: none; }
:deep(.el-collapse-item__header) {
  height: auto;
  min-height: 48px;
  padding: 6px 0;
  border-bottom: none;
  background: transparent;
}
:deep(.el-collapse-item__wrap) { border-bottom: none; }
:deep(.el-collapse-item__content) { padding-bottom: 0; }

/* 运行中的三个点动画 */
.running-indicator {
  margin-left: auto;
  margin-right: 10px;
  display: flex;
  gap: 3px;
}
.dot {
  width: 4px;
  height: 4px;
  background-color: #e6a23c;
  border-radius: 50%;
  animation: bounce 1.4s infinite ease-in-out both;
}
.dot:nth-child(1) { animation-delay: -0.32s; }
.dot:nth-child(2) { animation-delay: -0.16s; }
@keyframes bounce { 0%, 80%, 100% { transform: scale(0); } 40% { transform: scale(1); } }
</style>
- 数据分析组件
//Qjy.AICoplot.VueUI/src/components/chat/BlockAnalysis.vue
<script setup lang="ts">
import {DataLine, Monitor} from '@element-plus/icons-vue';
import {renderMarkdown} from '@/utils/markdown';
import FunctionCallItem from './FunctionCallItem.vue';
import {type ChatChunk, ChunkType} from "@/types/protocols.ts";
import type {FunctionCallChunk, WidgetChunk} from "@/types/models.ts";
import WidgetRenderer from '../widgets/WidgetRenderer.vue';

defineProps<{
  chunks: ChatChunk[]
  isStreaming: boolean
}>();

const getFunctionCall = (chunk: ChatChunk): FunctionCallChunk =>
  chunk as FunctionCallChunk;

const getWidget = (chunk: ChatChunk): WidgetChunk =>
  chunk as WidgetChunk;

</script>

<template>
  <div class="block-analysis">
    <div class="analysis-card">
      <div class="analysis-header">
        <el-icon class="header-icon"><DataLine /></el-icon>
        <span>数据分析与决策</span>
        <span v-if="isStreaming" class="typing-dot">...</span>
      </div>
      <div class="analysis-content">
        <template v-for="chunk in chunks">
          <div
            v-if="chunk.type === ChunkType.Text"
            class="markdown-body text-analysis mb-3"
            v-html="renderMarkdown(chunk.content)"
          ></div>

          <div v-else-if="chunk.type === ChunkType.FunctionCall" class="mb-3">
            <FunctionCallItem
            :call="getFunctionCall(chunk).functionCall"
            />
          </div>

          <div v-else-if="chunk.type === ChunkType.Widget" class="mb-3 widget-wrapper">
            <WidgetRenderer :data="getWidget(chunk).widget" />
          </div>
        </template>
      </div>
    </div>
  </div>
</template>

<style scoped>
.block-analysis { width: 100%; }
.analysis-card { background: #fafafa; border: 1px solid #dcdfe6; border-radius: 8px; overflow: hidden; }

/* 头部样式 */
.analysis-header {
  background: #f2f6fc;
  padding: 8px 12px;
  display: flex;
  align-items: center;
  color: #409eff;
  font-size: 13px;
  font-weight: 600;
  border-bottom: 1px solid #ebeef5;
}
.header-icon { margin-right: 6px; }

/* 内容区域 */
.analysis-content { padding: 12px; }
.text-analysis { font-size: 14px; color: #444; line-height: 1.6; }

/* 间距控制 */
.mb-3 { margin-bottom: 12px; }

/* Widget 容器样式 */
.widget-wrapper {
  margin-top: 5px;
  width: 100%;             /* 占满父容器 */
  max-width: 100%;         /* 限制最大宽度 */
  overflow-x: auto;        /* 关键:允许内部横向滚动 */
  -webkit-overflow-scrolling: touch; /* 移动端顺滑滚动 */
}

/* 动画 */
.typing-dot { animation: blink 1.5s infinite; margin-left: 4px; }
@keyframes blink { 0%, 100% { opacity: 1; } 50% { opacity: 0; } }
</style>
四、扩展 Widget
到目前我们已经完成了可视化的组件渲染,但还有一部分我们没有做完。后端数据分析的结果我们目前实现了 Card、Chart、DataTable 三种生成式 UI 的下消息格式。接下来我们来设计一个可扩展的 Widget 架构,先实现这三种消息格式的展示,同时还需要支持为了可扩展的其他格式的 UI 展示,比如人机交互、表单格式。
1. 实现 Widget 渲染器
//Qjy.AICoplot.VueUI/src/components/widgets/WidgetRenderer.vue
<script setup lang="ts">
import { defineAsyncComponent } from 'vue';
import type {Widget} from "@/types/protocols.ts";

const props = defineProps<{
  data: Widget
}>();

// 异步加载组件 (Code Splitting)
// 这样做的好处是,如果用户从未收到 Chart 类型的消息,ChartWidget 的代码就不会被加载
const ChartWidget = defineAsyncComponent(() => import('./ChartWidget.vue'));
const StatsWidget = defineAsyncComponent(() => import('./StatsWidget.vue'));
const DataTableWidget = defineAsyncComponent(() => import('./DataTableWidget.vue'));

// 简单的类型映射字典 (可选,也可以用 v-if/else-if)
// 这里为了简单直观,我们在模板中直接判断
</script>

<template>
  <div class="widget-renderer">
    <ChartWidget
      v-if="data.type === 'Chart'"
      :widget="(data as any)"
    />

    <StatsWidget
      v-else-if="data.type === 'StatsCard'"
      :widget="(data as any)"
    />

    <DataTableWidget
      v-else-if="data.type === 'DataTable'"
      :widget="(data as any)"
    />

    <div v-else class="unknown-widget">
      <el-alert
        :title="`暂不支持的组件类型: ${data.type}`"
        type="warning"
        show-icon
        :closable="false"
      />
      <pre class="debug-data">{{ data }}</pre>
    </div>
  </div>
</template>

<style scoped>
.widget-renderer {
  margin-top: 10px;
  width: 100%;
}

.unknown-widget {
  margin-top: 8px;
}

.debug-data {
  background: #f4f4f5;
  padding: 8px;
  border-radius: 4px;
  font-size: 11px;
  color: #909399;
  overflow-x: auto;
}
</style>
2. 实现三种数据分析 Widget
- 卡片展示
//Qjy.AICoplot.VueUI/src/components/widgets/StatsWidget.vue
<script setup lang="ts">
import { computed } from 'vue';
import type {StatsCardWidget} from "@/types/protocols.ts";

// 接收父组件传递的数据
const props = defineProps<{
  widget: StatsCardWidget
}>();

// 提取核心数据
const data = computed(() => props.widget.data);

// 格式化样式
const valueStyle = computed(() => ({
  color: '#303133',
  fontWeight: 'bold',
  fontSize: '24px'
}));
</script>

<template>
  <el-card shadow="hover" class="stats-card">
    <template #header>
      <div class="card-header">
        <span>{{ widget.title || data.label }}</span>
      </div>
    </template>

    <div class="card-content">
      <el-statistic
        :value="Number(data.value) || 0"
        :precision="2"
        :value-style="valueStyle"
      >
        <template #suffix>
          <span>{{ widget.data.unit }}</span>
        </template>
      </el-statistic>

    </div>
  </el-card>
</template>

<style scoped>
.stats-card {
  width: 240px; /* 固定宽度,看起来更整齐 */
  display: inline-block;
  margin-right: 12px;
  margin-bottom: 12px;
  border-radius: 8px;
}

.card-header {
  font-size: 14px;
  color: #606266;
  font-weight: 500;
}

.card-content {
  display: flex;
  flex-direction: column;
  gap: 8px;
}
</style>
- 数据列表展示
//Qjy.AICoplot.VueUI/src/components/widgets/DataTableWidget.vue
<script setup lang="ts">
  import { computed, ref } from 'vue';
  import type { DataTableWidget } from "@/types/protocols.ts";
  import { Filter, Setting, FullScreen } from '@element-plus/icons-vue';

  const props = defineProps<{
    widget: DataTableWidget
  }>();

  // ================== 状态管理 ==================

  // 控制列的显示/隐藏:存储当前选中的列 Key
  const visibleColumnKeys = ref<string[]>([]);

  // 初始化:默认显示所有列
  if (props.widget.data.columns) {
    visibleColumnKeys.value = props.widget.data.columns.map(c => c.key);
  }

  // 搜索关键词 (可选扩展)
  const searchQuery = ref('');

  // 控制弹出框显示
  const dialogVisible = ref(false);

  // ================== 计算属性 ==================

  /**
   * 最终用于渲染的列配置
   * 根据 visibleColumnKeys 过滤
   */
  const displayColumns = computed(() => {
    return props.widget.data.columns.filter(col => visibleColumnKeys.value.includes(col.key));
  });

  /**
   * 表格数据
   * Element Plus Table 自带排序和筛选,这里直接透传 rows
   * 如果需要前端全局搜索,可以在这里对 props.widget.data.rows 进行 filter
   */
  const tableData = computed(() => {
    let data = props.widget.data.rows;
    if (searchQuery.value) {
      const query = searchQuery.value.toLowerCase();
      data = data.filter(row =>
        Object.values(row).some(val => String(val).toLowerCase().includes(query))
      );
    }
    return data;
  });

  // ================== 辅助函数 ==================

  /**
   * 获取某一列的所有唯一值,用于生成筛选菜单
   */
  const getColumnFilters = (columnKey: string) => {
    const values = new Set(props.widget.data.rows.map(row => row[columnKey]));
    return Array.from(values).map(val => ({ text: String(val), value: val }));
  };

  /**
   * 筛选处理函数
   */
  const filterHandler = (value: string, row: any, column: any) => {
    const property = column['property'];
    return row[property] === value;
  };

  /**
   * 格式化单元格内容
   */
  const formatCell = (row: any, column: any, cellValue: any, index: number) => {
    const colDef = props.widget.data.columns.find(c => c.key === column.property);
    if (!colDef || cellValue == null) return cellValue;

    if (colDef.dataType === 'date') {
      // 简单日期格式化,实际项目中建议用 dayjs
      try {
        return new Date(cellValue).toLocaleDateString();
      } catch { return cellValue; }
    }

    if (colDef.dataType === 'number') {
      // 数字千分位
      return Number(cellValue).toLocaleString();
    }

    return cellValue;
  };

  /**
   * 打开弹出框显示全部数据
   */
  const openDataDialog = () => {
    dialogVisible.value = true;
  };
</script>

<template>
  <div class="data-table-widget">
    <div class="widget-header">
      <div class="title-area">
        <h3 class="widget-title">{{ widget.title }}</h3>
        <span class="widget-desc" v-if="widget.description">{{ widget.description }}</span>
      </div>

      <div class="actions">
        <el-input v-model="searchQuery"
                  placeholder="Search..."
                  size="small"
                  style="width: 150px; margin-right: 8px;"
                  clearable />

        <el-button :icon="FullScreen"
                   circle
                   size="small"
                   @click="openDataDialog"
                   title="弹出全部数据"
                   style="margin-right: 8px;" />

        <el-popover placement="bottom-end" :width="200" trigger="click">
          <template #reference>
            <el-button :icon="Setting" circle size="small" />
          </template>
          <div class="column-settings">
            <div class="settings-title">Visible Columns</div>
            <el-checkbox-group v-model="visibleColumnKeys" direction="vertical">
              <div v-for="col in widget.data.columns" :key="col.key" class="setting-item">
                <el-checkbox :value="col.key" :label="col.label" />
              </div>
            </el-checkbox-group>
          </div>
        </el-popover>
      </div>
    </div>

    <div class="table-content">
      <el-table :data="tableData"
                style="width: 100%"
                height="300"
                stripe
                border
                size="small">
        <el-table-column v-for="col in displayColumns"
                         :key="col.key"
                         :prop="col.key"
                         :label="col.label"
                         :min-width="120"
                         sortable
                         resizable
                         :filters="getColumnFilters(col.key)"
                         :filter-method="filterHandler"
                         :formatter="formatCell" />

        <template #empty>
          <el-empty description="No Data" :image-size="60" />
        </template>
      </el-table>
    </div>

    <!-- 弹出框显示全部数据 -->
    <el-dialog v-model="dialogVisible"
               :title="`全部数据 - ${widget.title}`"
               width="90%"
               top="5vh"
               class="full-data-dialog">
      <div class="dialog-content">
        <div class="data-summary">
          共 <strong>{{ tableData.length }}</strong> 条数据
        </div>
        <el-table :data="tableData"
                  style="width: 100%"
                  max-height="600"
                  stripe
                  border
                  size="small">
          <el-table-column v-for="col in displayColumns"
                           :key="col.key"
                           :prop="col.key"
                           :label="col.label"
                           :min-width="150"
                           sortable
                           resizable
                           :filters="getColumnFilters(col.key)"
                           :filter-method="filterHandler"
                           :formatter="formatCell" />

          <template #empty>
            <el-empty description="No Data" :image-size="60" />
          </template>
        </el-table>
      </div>

      <template #footer>
        <span class="dialog-footer">
          <el-button @click="dialogVisible = false">关闭</el-button>
        </span>
      </template>
    </el-dialog>
  </div>
</template>

<style scoped>
  .data-table-widget {
    width: 100%;
    background: #fff;
    border-radius: 8px;
    border: 1px solid #e4e7ed;
    padding: 12px;
    margin-top: 8px;
    box-shadow: 0 2px 4px rgba(0,0,0,0.05);
    display: flex;
    flex-direction: column;
  }

  .widget-header {
    display: flex;
    justify-content: space-between;
    align-items: center;
    margin-bottom: 12px;
  }

  .title-area {
    display: flex;
    flex-direction: column;
  }

  .widget-title {
    margin: 0;
    font-size: 14px;
    font-weight: 600;
    color: #303133;
  }

  .widget-desc {
    font-size: 12px;
    color: #909399;
  }

  .actions {
    display: flex;
    align-items: center;
  }

  .column-settings {
    max-height: 250px;
    overflow-y: auto;
  }

  .settings-title {
    font-size: 12px;
    font-weight: bold;
    color: #606266;
    margin-bottom: 8px;
    padding-bottom: 4px;
    border-bottom: 1px solid #EBEEF5;
  }

  .setting-item {
    margin-bottom: 4px;
  }

  .dialog-content {
    max-height: 70vh;
    overflow: hidden;
  }

  .data-summary {
    margin-bottom: 16px;
    padding: 8px 12px;
    background-color: #f5f7fa;
    border-radius: 4px;
    font-size: 14px;
    color: #606266;
  }
</style>

<style>
  .full-data-dialog .el-dialog__body {
    padding: 20px;
  }
</style>
- Chart 图展示
//Qjy.AICoplot.VueUI/src/components/widgets/ChartWidget.vue
<script setup lang="ts">
import { ref, onMounted, onUnmounted, watch, nextTick, computed } from 'vue';
import * as echarts from 'echarts';
import type {ChartWidget} from "@/types/protocols.ts";

const props = defineProps<{
  widget: ChartWidget
}>();

// DOM 引用:用于挂载 Canvas
const chartRef = ref<HTMLElement | null>(null);
// ECharts 实例引用
let chartInstance: echarts.ECharts | null = null;
// ResizeObserver 实例
let resizeObserver: ResizeObserver | null = null;

// ================== 核心逻辑:数据转换 (Adapter) ==================

/**
 * 将后端 DTO 转换为 ECharts Option
 * 这是连接业务数据与可视化库的桥梁
 */
const getChartOption = () => {
  const chartType = props.widget.data.category;
  const { x, y, seriesName } = props.widget.data.encoding;
  const { dimensions, source } = props.widget.data.dataset;
  const title = props.widget.title;

  // 1. 通用基础配置
  const baseOption: any = {
    title: {
      text: title,
      left: 'center',
      textStyle: { fontSize: 14, color: '#333' }
    },
    tooltip: {
      trigger: chartType === 'Pie' ? 'item' : 'axis', // 饼图触发方式不同
      confine: true // 将 Tooltip 限制在图表容器内
    },
    legend: {
      bottom: 0, // 图例放在底部
      type: 'scroll' // 图例过多时允许滚动
    },
    grid: {
      left: '3%',
      right: '4%',
      bottom: '15%', // 留出空间给图例
      containLabel: true
    }
  };

  // 2. 根据图表类型构建配置
  // 后端返回的 chartType 首字母大写 (Bar, Line, Pie),ECharts 需要小写 (bar, line, pie)
  const typeLower = chartType.toLowerCase();

  if (chartType === 'Pie') {
    // ---- 饼图逻辑 ----
    const pieData = source.map((item: any) => ({
      name: item[x],
      value: item[y[0]] // 饼图通常只使用第一个y字段
    }));

    return {
      ...baseOption,
      tooltip: {
        ...baseOption.tooltip,
        formatter: '{a} <br/>{b}: {c} ({d}%)' // 自定义提示框格式
      },
      series: [{
        name: title,
        type: 'pie',
        radius: ['40%', '70%'], // 环形饼图
        avoidLabelOverlap: true,
        label: {
          show: true,
          formatter: '{b}: {c} ({d}%)'
        },
        emphasis: {
          label: {
            show: true,
            fontSize: '16',
            fontWeight: 'bold'
          }
        },
        data: pieData
      }]
    };
  } else {
    // ---- 柱状图 / 折线图逻辑 ----

    // 提取x轴数据
    const xAxisData = [...new Set(source.map((item: any) => item[x]))];

    // 构建系列数据
    const seriesData = y.map((yField, index) => {
      const seriesItem: any = {
        name: yField,
        type: typeLower,
        data: source.map((item: any) => item[yField])
      };

      // 柱状图特定配置
      if (chartType === 'Bar') {
        seriesItem.barWidth = '60%';
        seriesItem.itemStyle = {
          color: index === 0 ? '#5470c6' :
            index === 1 ? '#91cc75' :
              index === 2 ? '#fac858' :
                index === 3 ? '#ee6666' :
                  index === 4 ? '#73c0de' : '#3ba272',
          borderRadius: [2, 2, 0, 0] // 顶部圆角
        };

        // 渐变色效果
        if (index < 2) { // 前两个系列使用渐变色
          seriesItem.itemStyle.color = new echarts.graphic.LinearGradient(
            0, 0, 0, 1,
            [
              { offset: 0, color: index === 0 ? '#5470c6' : '#91cc75' },
              { offset: 1, color: index === 0 ? '#304c82' : '#5a8c5a' }
            ]
          );
        }
      }
      // 折线图特定配置
      else if (chartType === 'Line') {
        seriesItem.smooth = true; // 平滑曲线
        seriesItem.symbol = 'circle'; // 数据点形状
        seriesItem.symbolSize = 6;
        seriesItem.lineStyle = {
          width: 2
        };
        seriesItem.itemStyle = {
          color: index === 0 ? '#5470c6' :
            index === 1 ? '#91cc75' :
              index === 2 ? '#fac858' :
                '#ee6666'
        };

        // 面积图效果(可选)
        if (y.length === 1) { // 只有一个系列时显示面积图
          seriesItem.areaStyle = {
            opacity: 0.1
          };
        }
      }

      return seriesItem;
    });

    const option = {
      ...baseOption,
      xAxis: {
        type: 'category',
        data: xAxisData,
        axisLabel: {
          interval: 0, // 强制显示所有标签
          rotate: xAxisData.length > 6 ? 45 : 0 // 标签过多时旋转
        }
      },
      yAxis: {
        type: 'value',
        splitLine: {
          lineStyle: {
            type: 'dashed'
          }
        }
      },
      series: seriesData
    };

    // 多系列柱状图添加数据标签避免重叠
    if (chartType === 'Bar' && y.length > 1) {
      option.series.forEach((series: any, index: number) => {
        series.label = {
          show: index === 0, // 只显示第一个系列的标签
          position: 'top',
          fontSize: 12
        };
      });
    }

    return option;
  }
};

// ================== 生命周期管理 ==================

/**
 * 初始化图表
 */
const initChart = () => {
  if (!chartRef.value) return;

  // 初始化实例,并应用 light 主题
  chartInstance = echarts.init(chartRef.value, null, { renderer: 'canvas' });

  // 设置数据
  try {
    const option = getChartOption();
    chartInstance.setOption(option);
  } catch (e) {
    console.error('ECharts Option Error:', e);
  }
};

/**
 * 处理窗口大小变化
 * 使用 ResizeObserver 比 window.onresize 更精确,能监听到 div 本身的变化
 */
const setupResizeObserver = () => {
  if (!chartRef.value) return;

  // 防抖函数
  const debounce = (func: Function, delay = 150) => {
    let timeoutId: ReturnType<typeof setTimeout>;
    return (...args: any[]) => {
      clearTimeout(timeoutId);
      timeoutId = setTimeout(() => func(...args), delay);
    };
  };

  // 创建ResizeObserver实例
  resizeObserver = new ResizeObserver(debounce(() => {
    try {
      if (chartInstance?.isDisposed()) {
        resizeObserver?.unobserve(chartRef.value!);
        return;
      }

      if (chartInstance && chartRef.value) {
        const rect = chartRef.value.getBoundingClientRect();
        if (rect.width > 0 && rect.height > 0) {
          chartInstance.resize();
        }
      }
    } catch (error) {
      console.error('图表resize失败:', error);
    }
  }, 150));

  resizeObserver.observe(chartRef.value);
};

onMounted(async () => {
  // 等待 DOM 渲染完成
  await nextTick();
  initChart();
  setupResizeObserver();
});

onUnmounted(() => {
  // 销毁资源
  resizeObserver?.disconnect();
  resizeObserver = null;
  chartInstance?.dispose();
  chartInstance = null;
  chartRef.value = null; // 清理引用
});

// 监听数据变化(虽然目前是一次性渲染,但保留此逻辑支持实时更新)
watch(() => props.widget, () => {
  if (chartInstance) {
    chartInstance.setOption(getChartOption(), true); // true 表示不合并,完全重置
  }
}, { deep: true });

</script>

<template>
  <div class="chart-container">
    <div ref="chartRef" class="echarts-dom"></div>
  </div>
</template>

<style scoped>
.chart-container {
  width: 100%;
  max-width: 600px; /* 限制最大宽度,防止在大屏上太宽 */
  background: #fff;
  border-radius: 8px;
  border: 1px solid #e4e7ed;
  padding: 16px;
  margin-top: 8px;
}

.echarts-dom {
  width: 100%;
  height: 350px; /* 固定高度,确保 Canvas 有渲染空间 */
}
</style>
五、测试
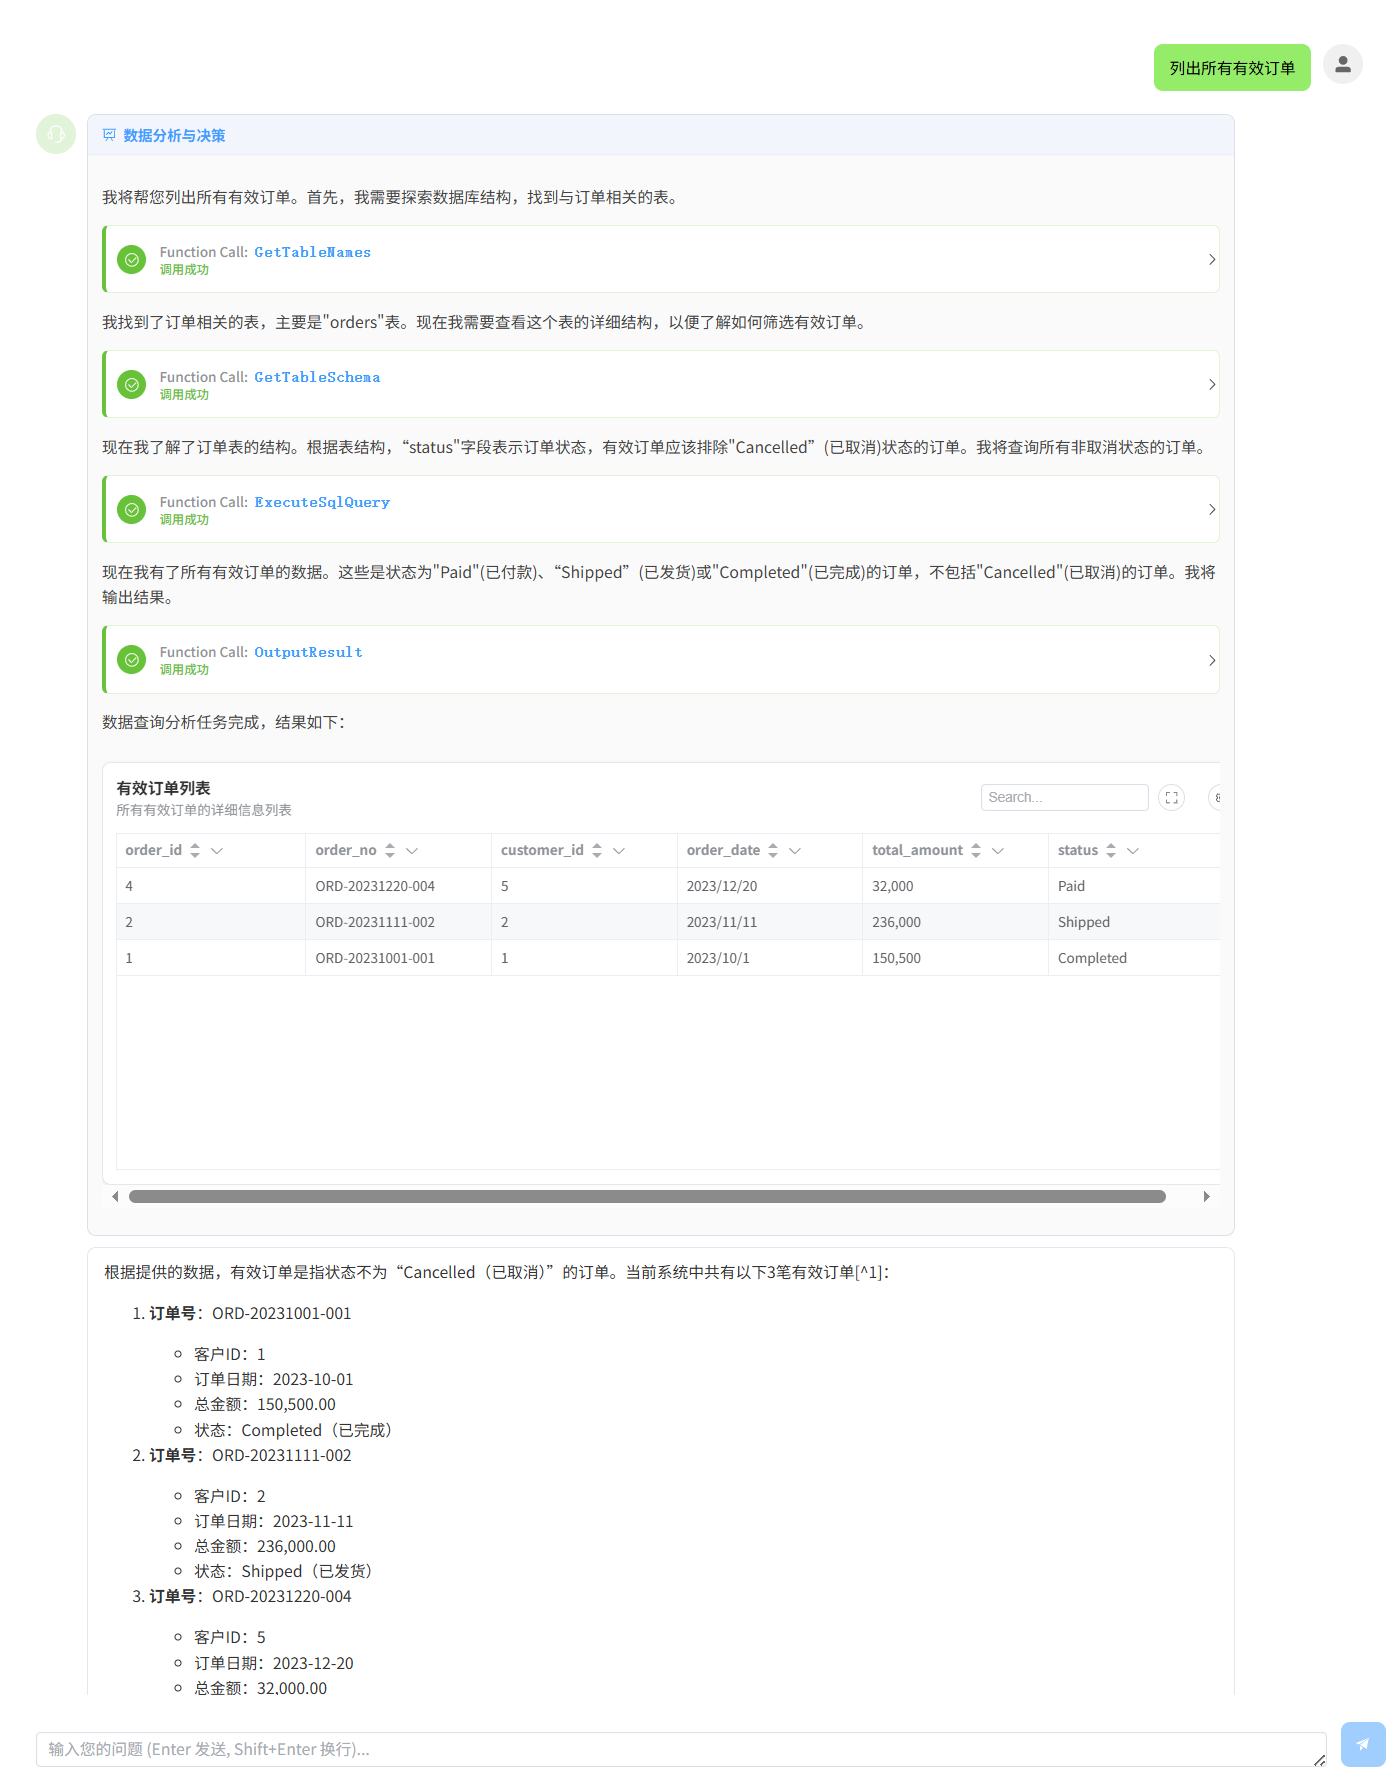
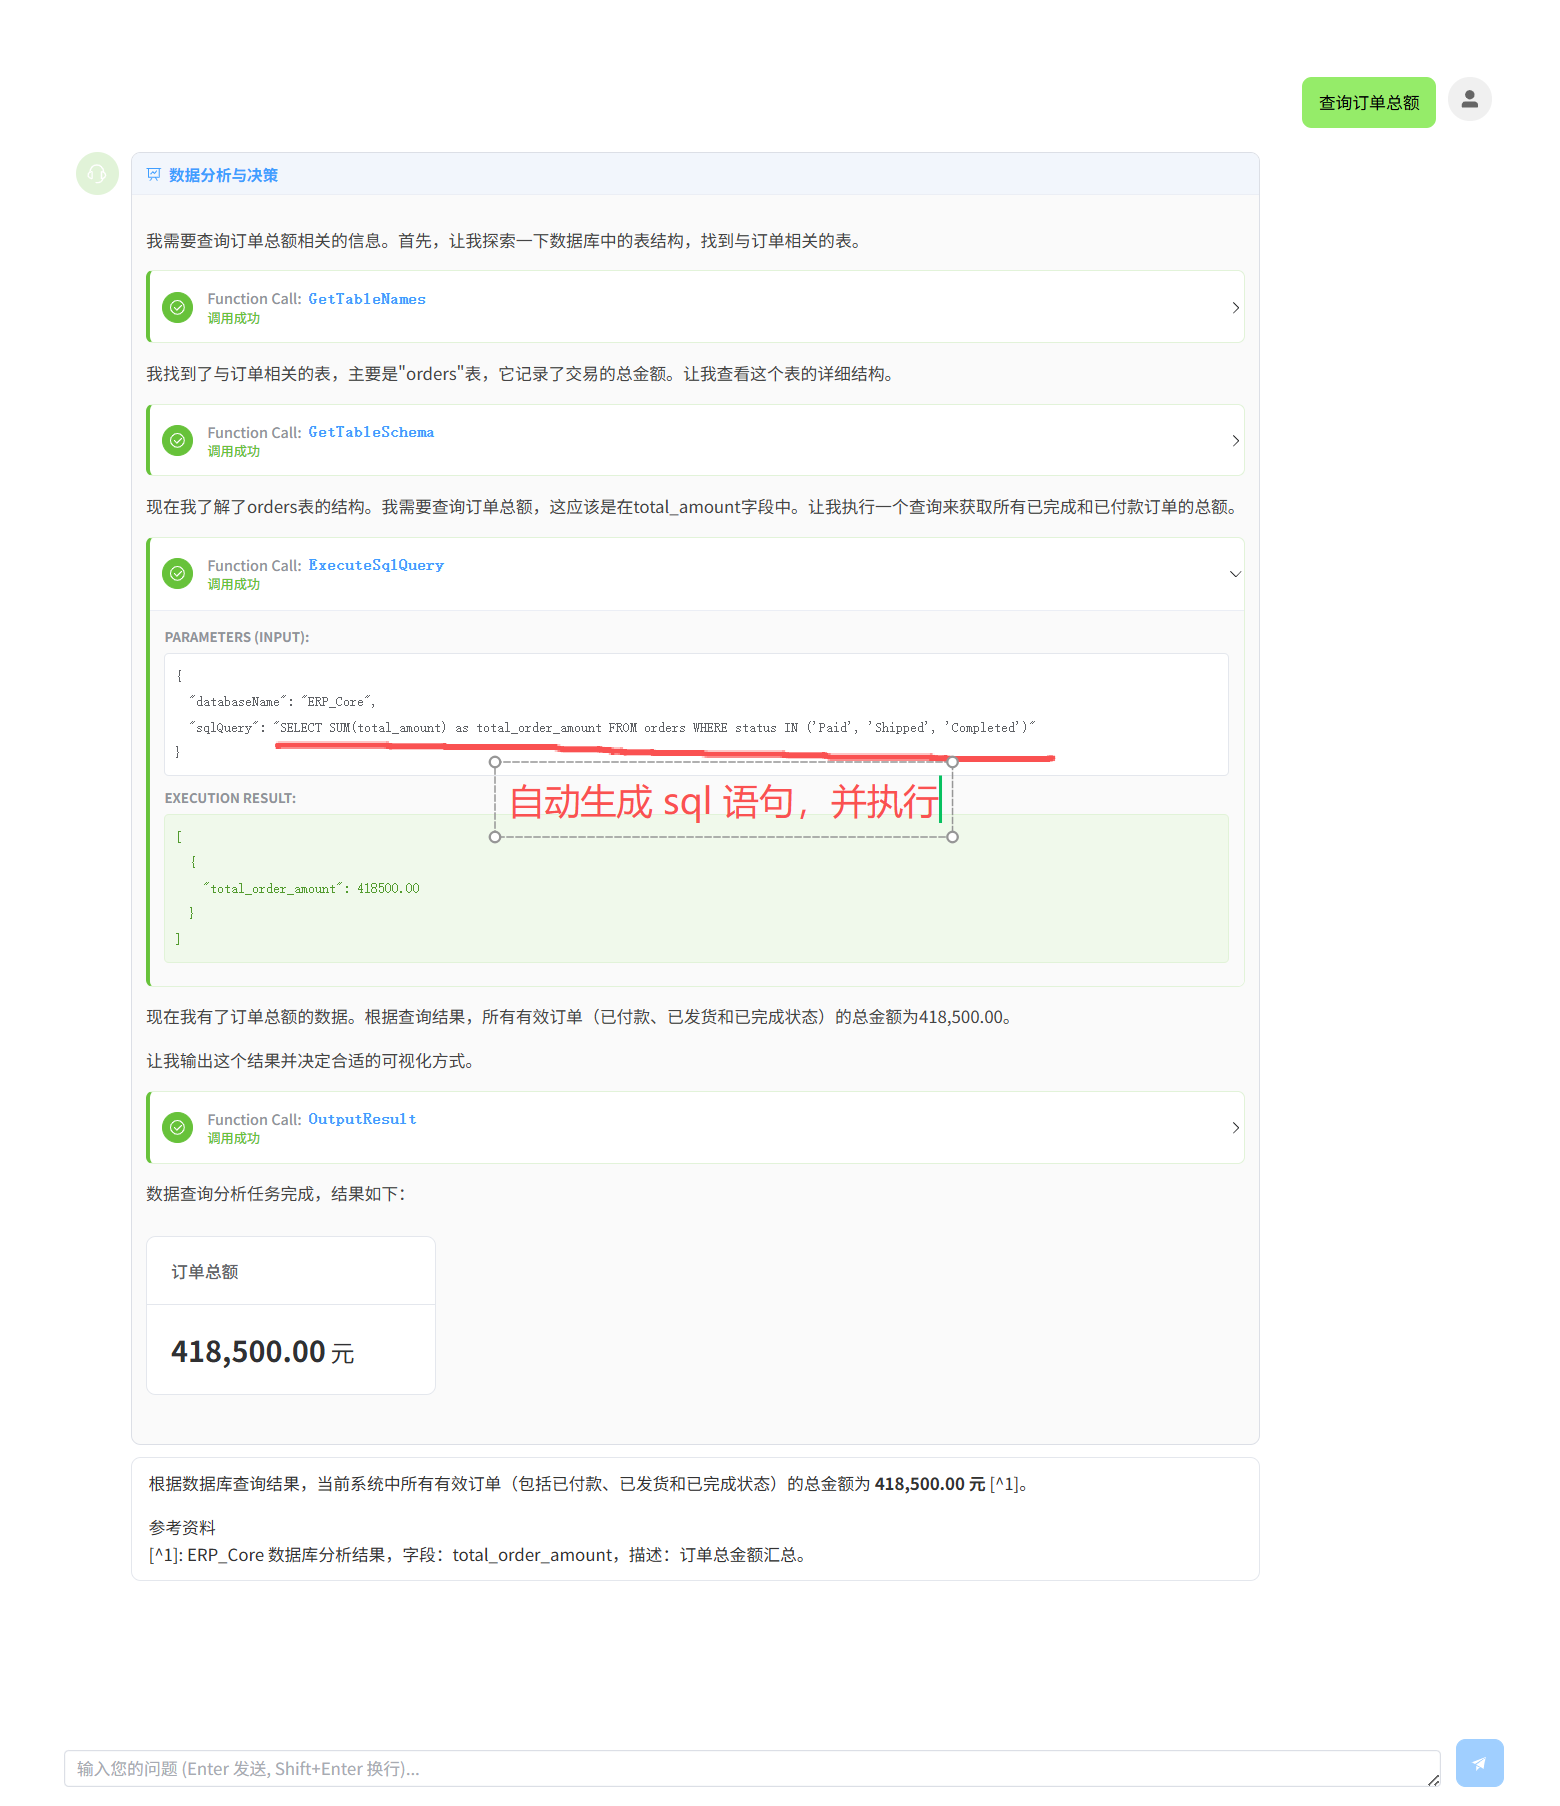
1. 输出卡片
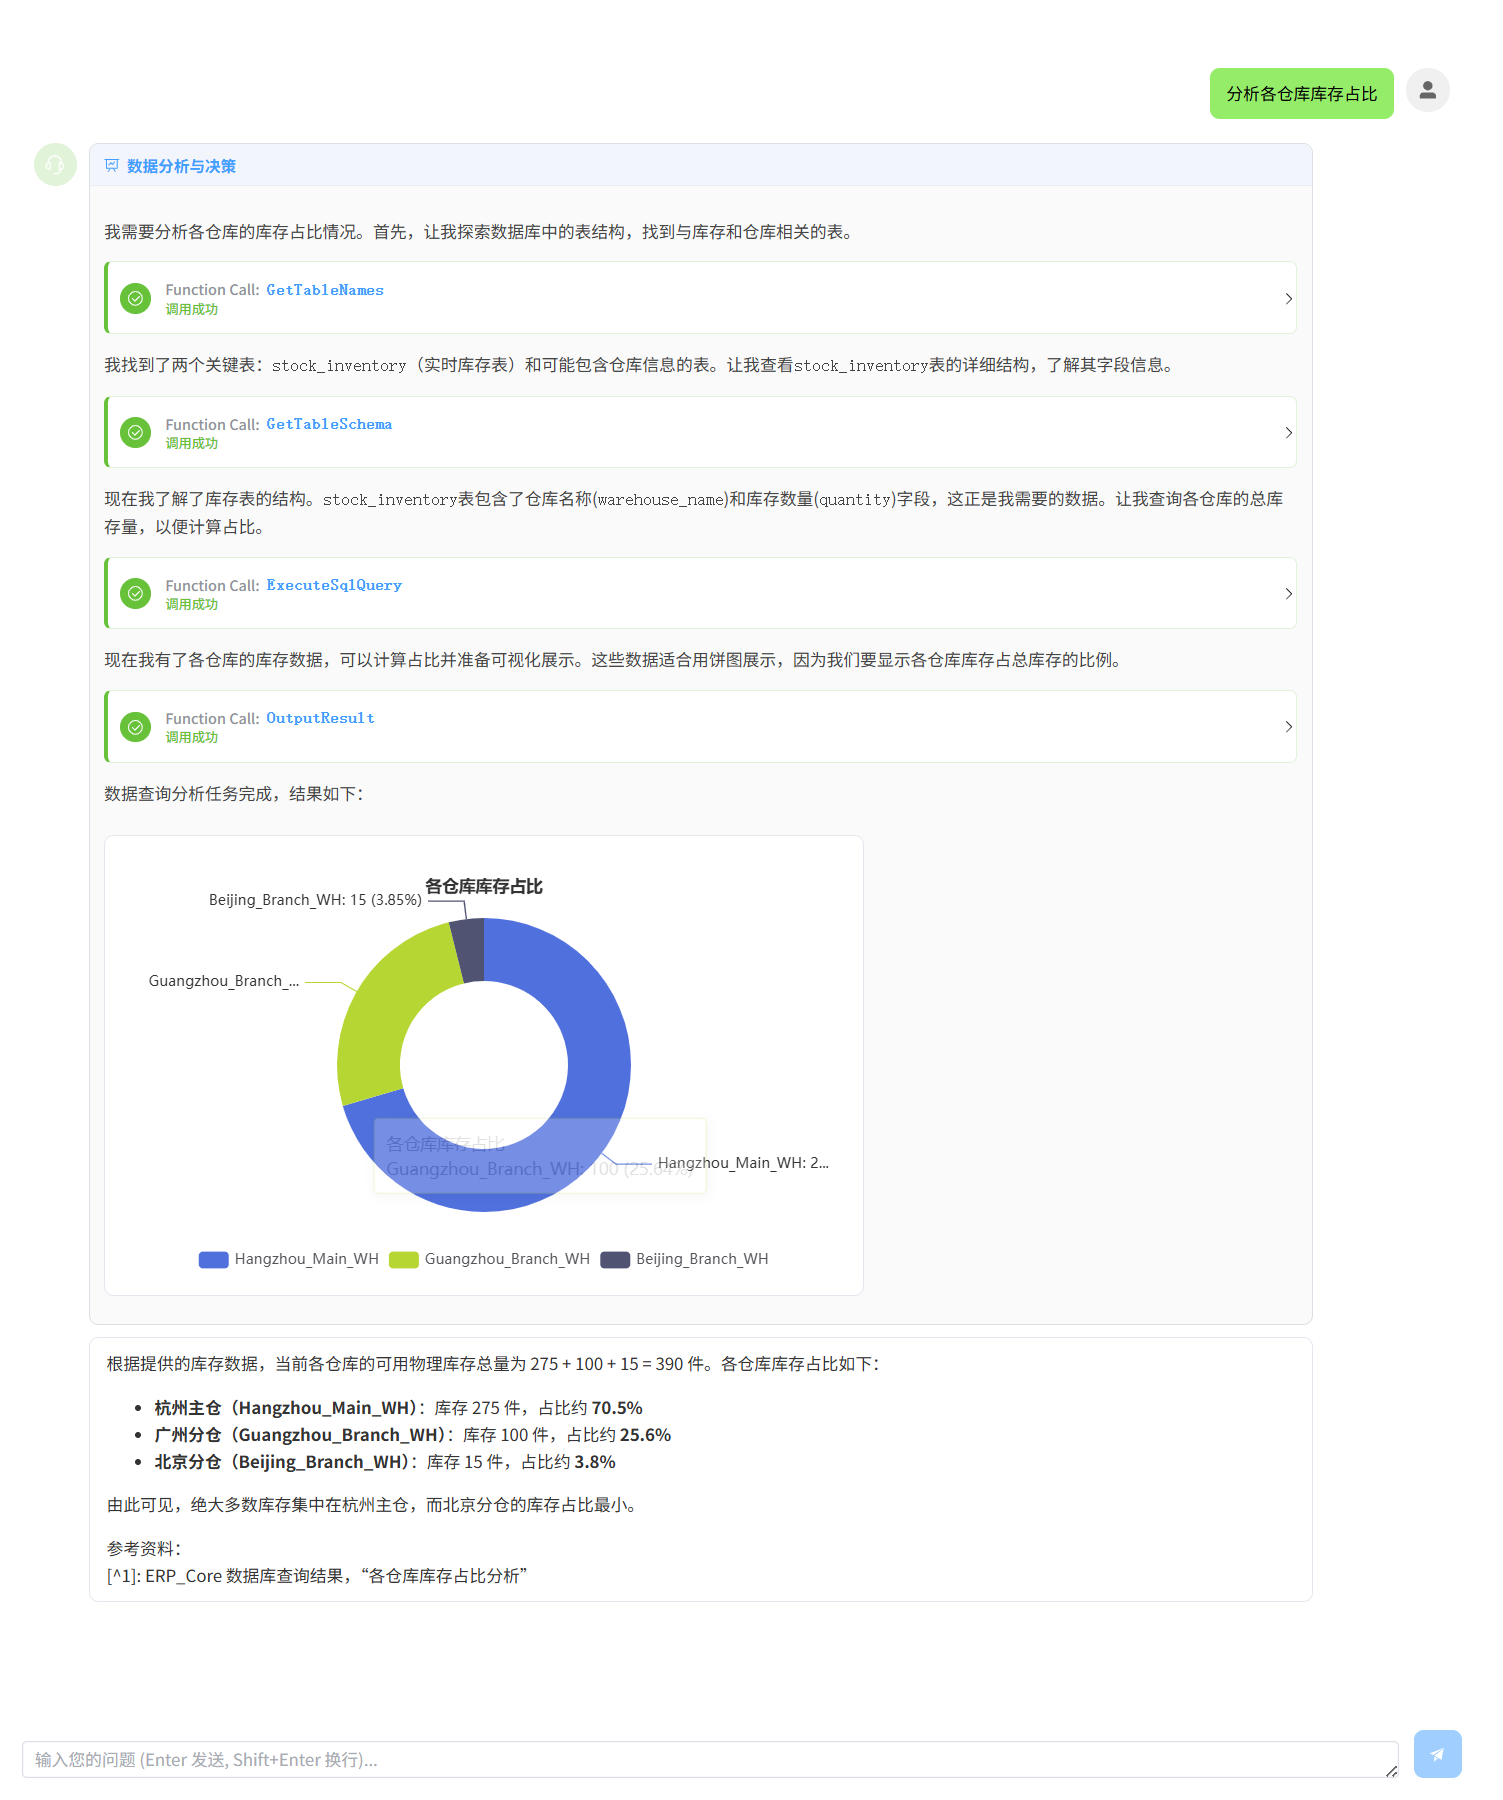
2. 输出图表
3. 输出表格